
This week’s Scrivener Saturday: Multi-Book Projects & Using Binders to Contain Them.
[important]This tip has been edited to demonstrate a shorter, better way to do this. Thanks to Gwen Hernandez, author of the book, Scrivener for Dummies, for the faster & better way to do it! [/important]
When I finished Amaskan’s Blood, Book I of the Boahim Series, I didn’t want to start a new project for Amaskan’s War (Book II). Too much of my research, character notes, worldbuilding, etc. are in that first project to begin again with a clean slate.
I didn’t want to have to copy and paste or even import in certain parts and not others, as that would be time-consuming. I’ve got better things to do with my writing time. What I did instead was embrace Scrivener’s Binders.
[warning]Because this involves moving around your writing files inside the project (albeit in a few short steps), please backup your project before doing this. That way, if you don’t like it, you haven’t accidentally lost anything. [/warning]
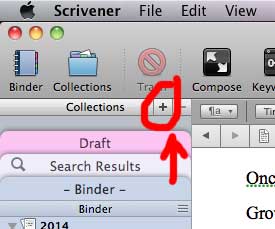
STEP 1: Click on the + next to the COLLECTIONS heading of the binder. (See screenshot for details.)
STEP 2: Name your new binder. For my New Collection, I typed in AB: B1, which for me, meant Amaskan’s Blood, Book I.
STEP 3: Move your Book I’s content to the new binder. To do that, I:
- Clicked the binder with all my files
- Pressed CTRL-A (or Command-A) on the keyboard to select all the files
- Right-click (or Control-Click) and choose Group (This will put all the files into their own folder and preserve the hierarchy).
- Name the folder something like Book I.
- Drag your new folder to your new binder aka collection.
STEP 4: Create a new folder for Book II and begin writing/planning!
[important]Why didn’t I just use the new binder for Book 2?[/important]
Good question! If you look at the Binder you created, you’ll notice it doesn’t have a Trash can. Binders you create aren’t the same as that initial binder in Scrivener. Since Book I is mainly for reference at this point, I don’t need it to be in the starting binder–just one I can access and read.
What I Love about This Feature: I don’t have to open and juggle multiple project files or do crazy importing to keep a series together.
Downside to This Feature: I really wish Binders you create were the same as the initial one (with the trash can and such). Would make this more streamlined. (And if you can, and I’ve missed this feature, let me know!!)
Check out the entire series of Scrivener Saturday posts here.

Actually, if you add your files to a collection, it’s just a different view of the original files (basically links). Once you delete the original files from the Binder and empty your trash can, the files will disappear from your collection too. 🙁
The easier way would be to just select all the files from the first book, right-click (or Control+click for Mac) and choose Group. This will put them all into their own folder that you can move anywhere within the Binder (probably outside of the Draft). It will also preserve their hierarchy as you had it in the Draft.
Gwen Hernandez When I did this in Mac, it didn’t delete the files. Interesting. Ah! I knew there was probably an easier way to do this! Thanks!! I will add that up above and attribute it to you, Gwen.
(BTW, your book on Scrivener is awesome!)